
Kandi Basics and X-Cuff Tutorial
Hello everyone! I made a tutorial about kandi making on Art Anarchy a while ago, and I'm going to post it here, as well.
Recently, a friend of mine showed me how to make Kandi bracelets and cuffs, and I thought I'd like to share what I learned here! I won't be posting pictures of my projects since I worry they're too identifiable since I wear them sometimes, but feel free to share yours if you'd like. In the meantime, here's some info about how to get started making kandi plus a tutorial I made for how to create an x-cuff. I'd love to see any tutorials you have, too!
Supplies you'll need:
- Kandi cord - this should be elastic cord, with a thin coating of fabric. It shouldn't be too thick, 1 millimeter is usually good. It comes in many colors.
- Pony beads - these are plastic beads with a large hole. The basic ones are round and you can get a set with a lot of different colors either online or at a craft store. I usually order from Beadtin.
- Optional extra beads - different shapes of beads that aren't just round, stars and hearts are common but you can find all sorts of things - bells can also work, for instance. If you're going to be using them for an x cuff or other complicated project, be sure they have a big enough hole to put your cord through 2 or 3 times.
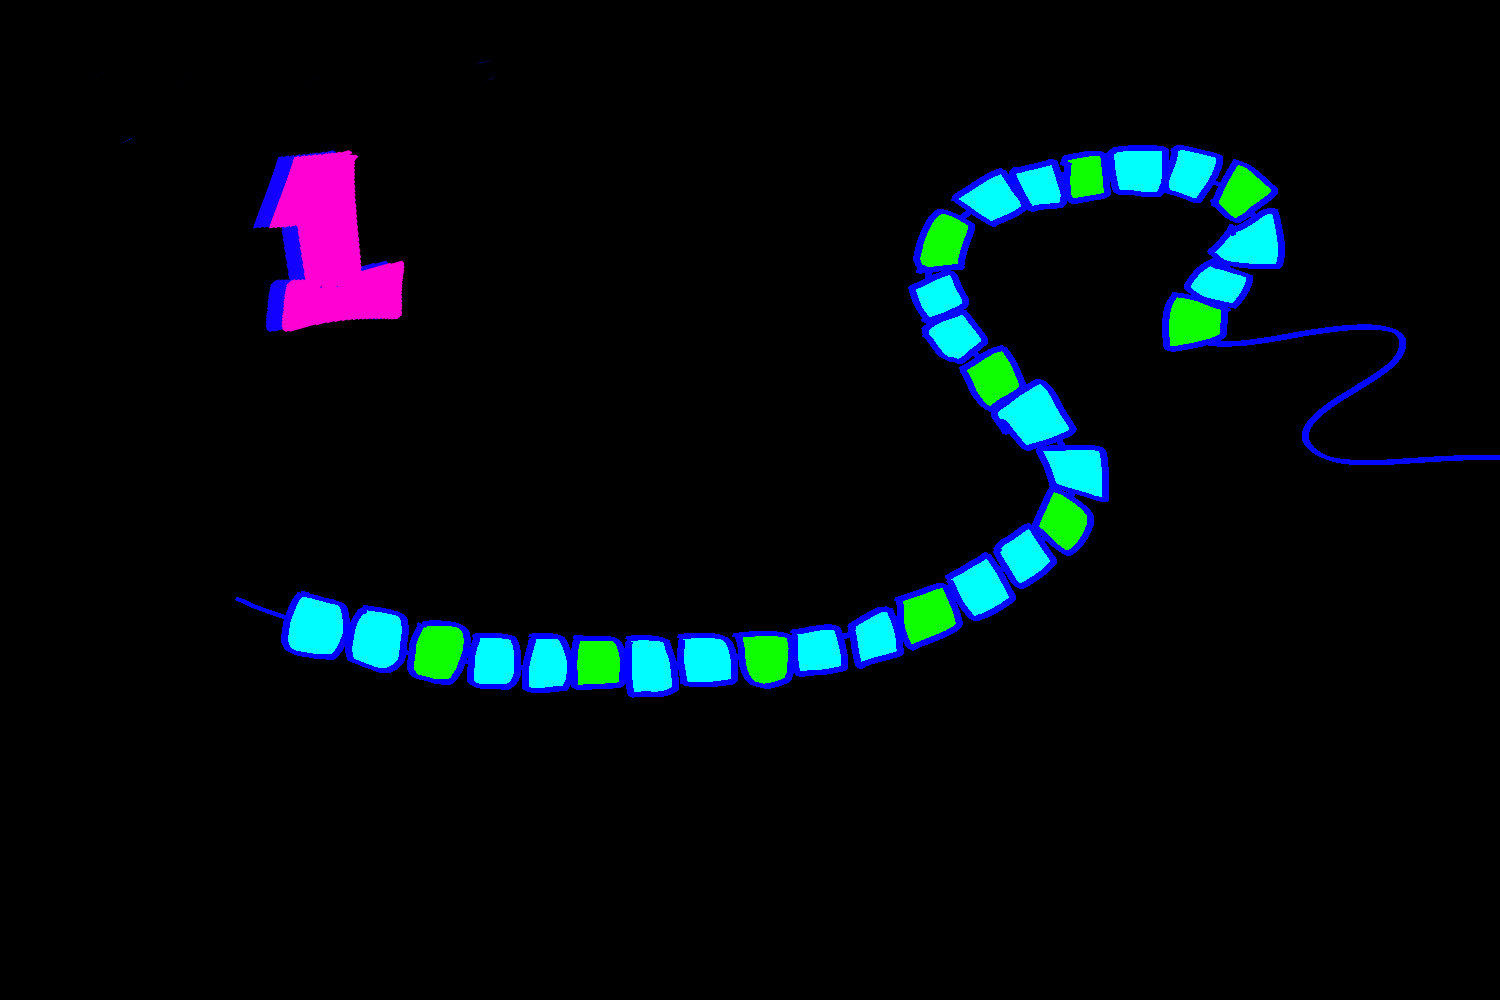
The most simple way to make kandi is to just put a bunch of these beads on a string and then tie it off once it's about the right size for your wrist. This is fairly self explanatory.
When making kandi, it's good to use a lighter to burn the ends of string and any knots that you tie, so they stay better and don't fray. However, this is not essential, and I don't usually do it because my hand problems make it hard for me to use a lighter safely.
An x-cuff is a somewhat more complicated style of kandi that's sort of 3 dimensional. It has a flat base that's fairly tall and goes around your hand, and then a second layer of decorative stuff on top. There are tutorials for this online already, but frankly, I couldn't find one that was easy for me to follow, so I hope this is helpful to someone.

You can modify this for a bigger wrist or to wear higher on your arm by extending the same pattern, or a smaller wrist by shortening the pattern. The size shown here should work for small to medium wrists - my wrists are very small and it's loose on me, but doesn't fall off because my hand blocks it from doing so.
For this particular size, you will need the following, labeled with descriptions + their color in the tutorial:
- 10 of your special accent bead (pink star)
- 40 of the bead that goes in a line around the top and bottom of the kandi (cyan)
- 30 of the bead that goes in between the sets of line beads and interior x beads (green)
- 40 of the bead that makes the 2D x's inside your cuff (yellow)
- 40 of each color bead for the 3D x's around the accent beads (orange and purple)
- Roughly 90 inches of cord for the main cuff
- Roughly 65 inches of cord for the 3D x's
If you run out of cord while making your kandi, don't panic, just tie more cord on the end and continue.
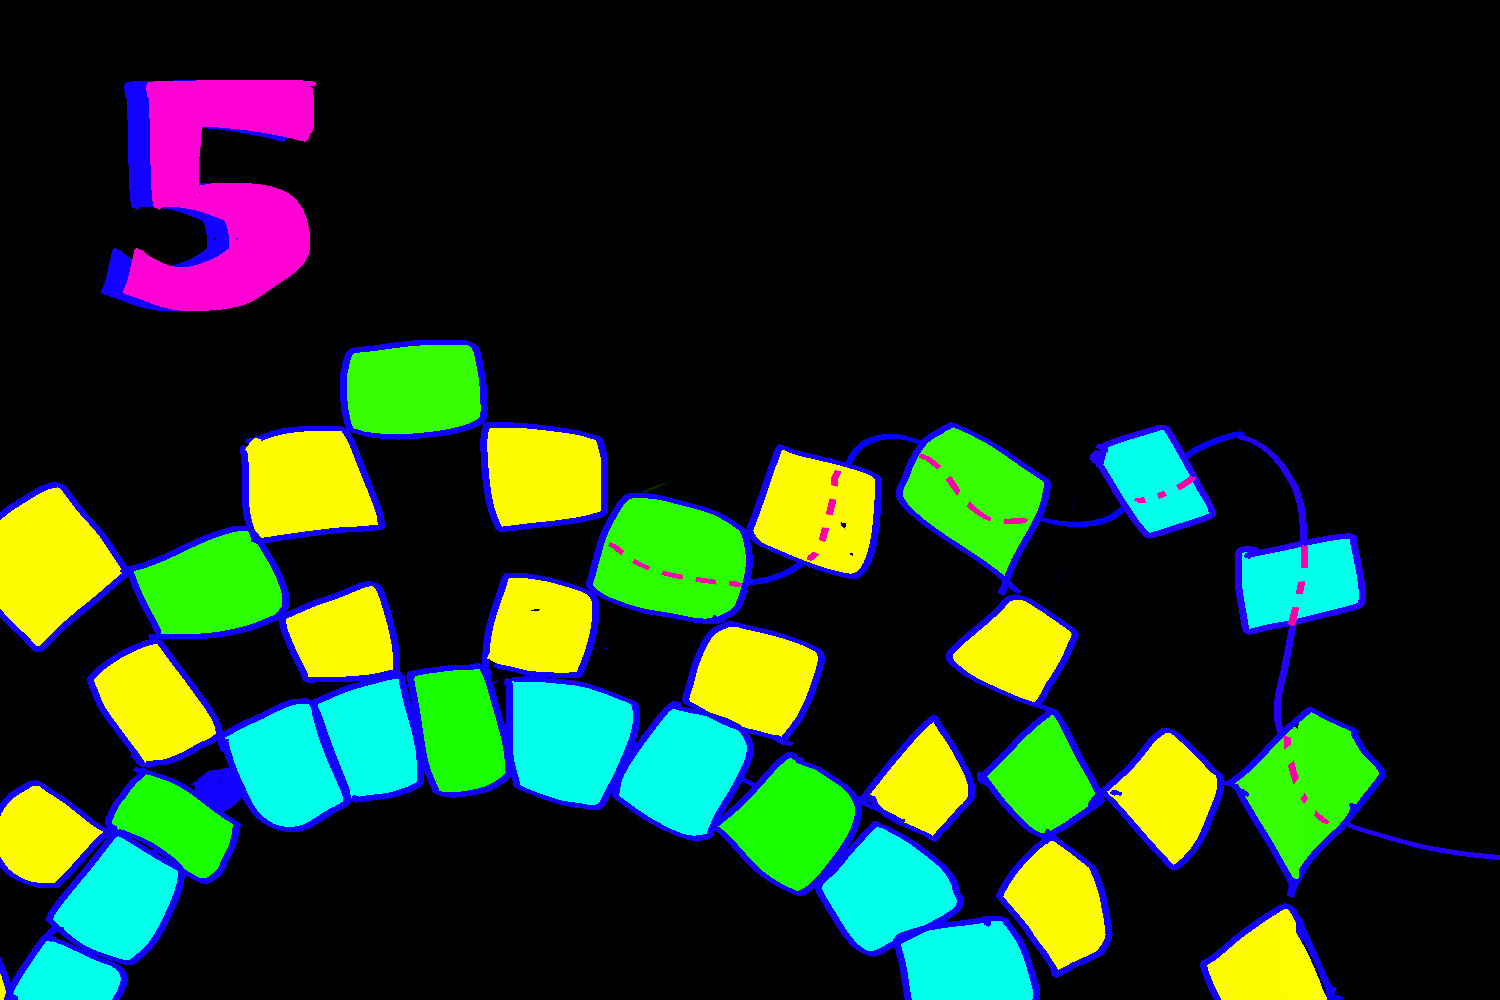
For step 1, just string beads on in this pattern. There should be 20 line beads in sets of 2 with a total of 10 in between beads.
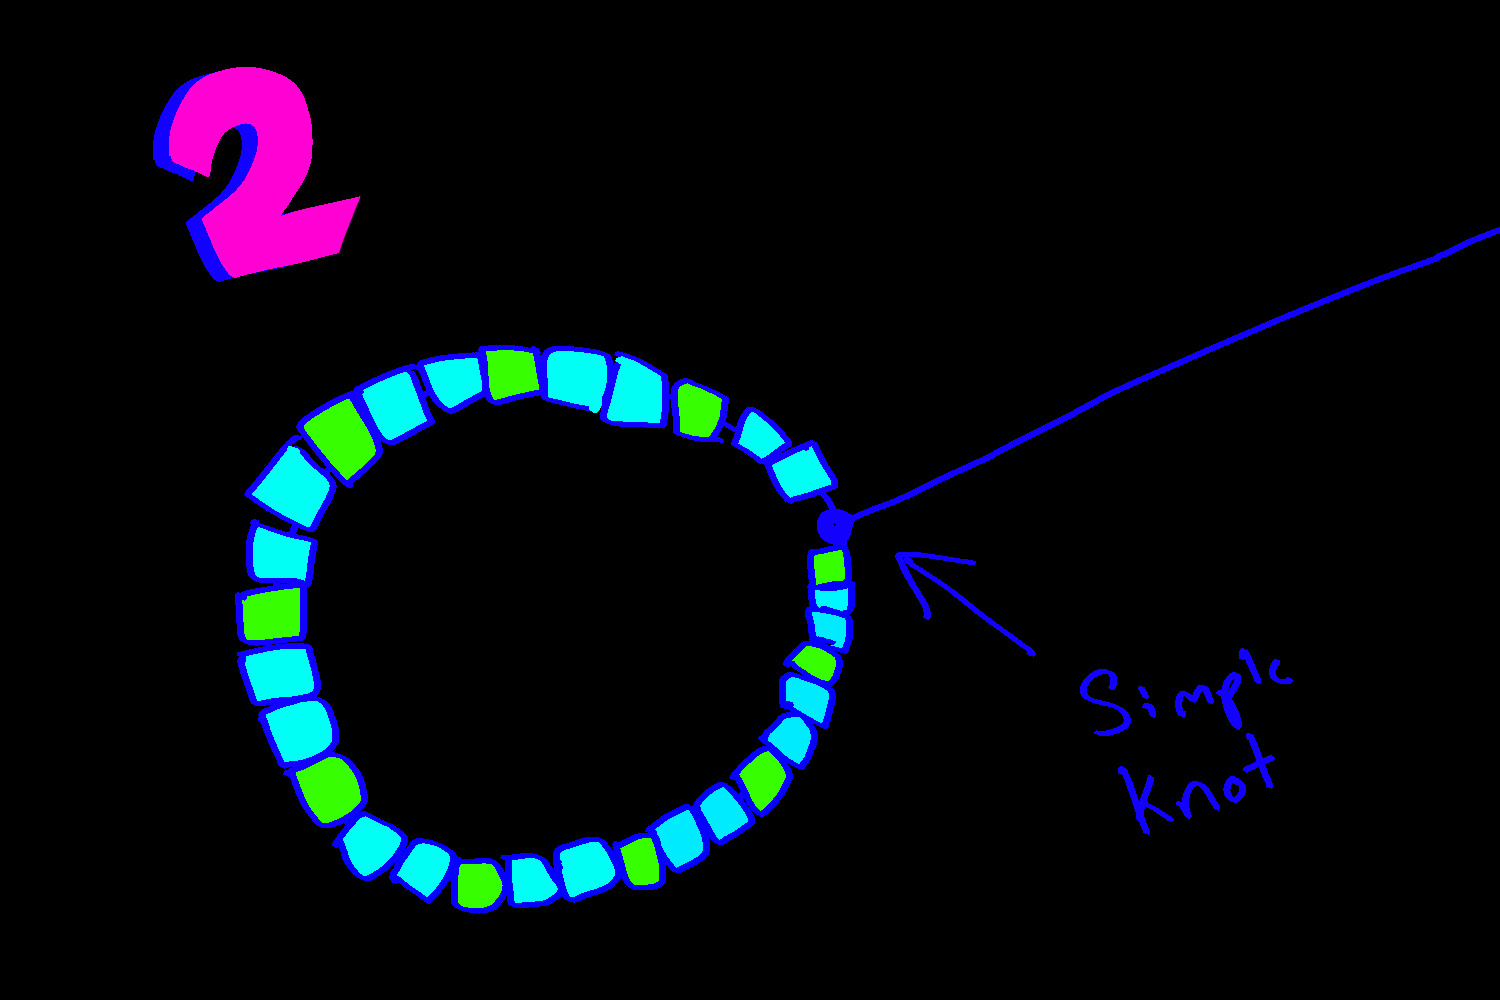
For step 2, tie the beads off like you are making a simple bracelet, but do not cut the cord.
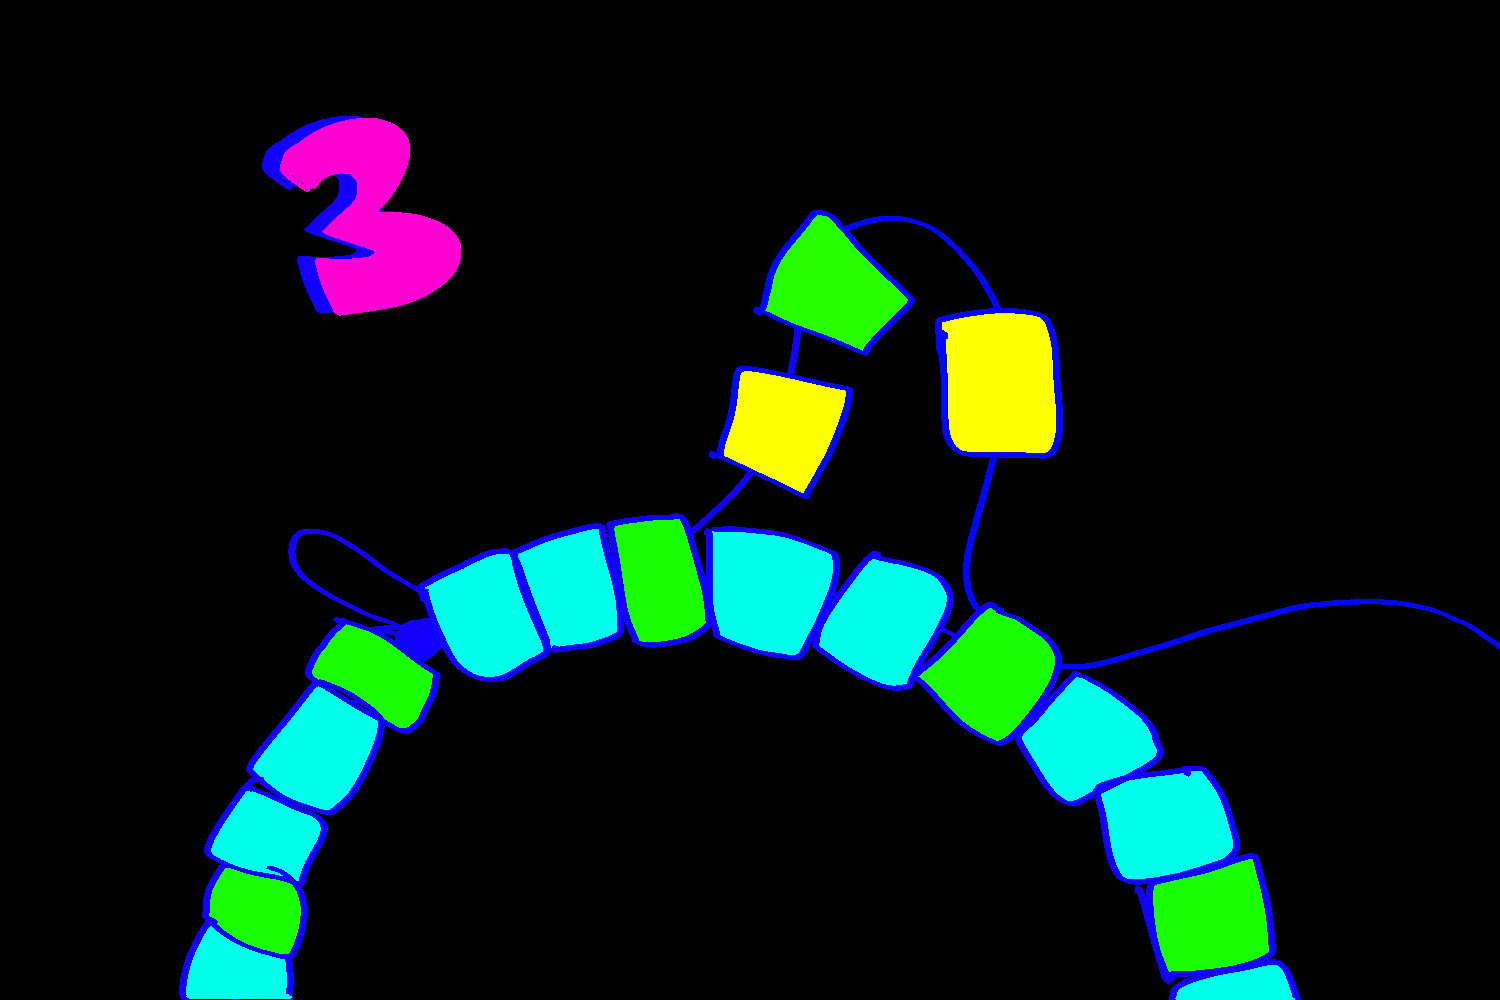
For step 3, begin making your interior x's by stringing the your cord back through your bracelet until it comes through an in between bead, then add 2 interior x beads and 1 in between bead in the pattern shown. String it through the next in between bead, and continue the pattern around your whole bracelet.
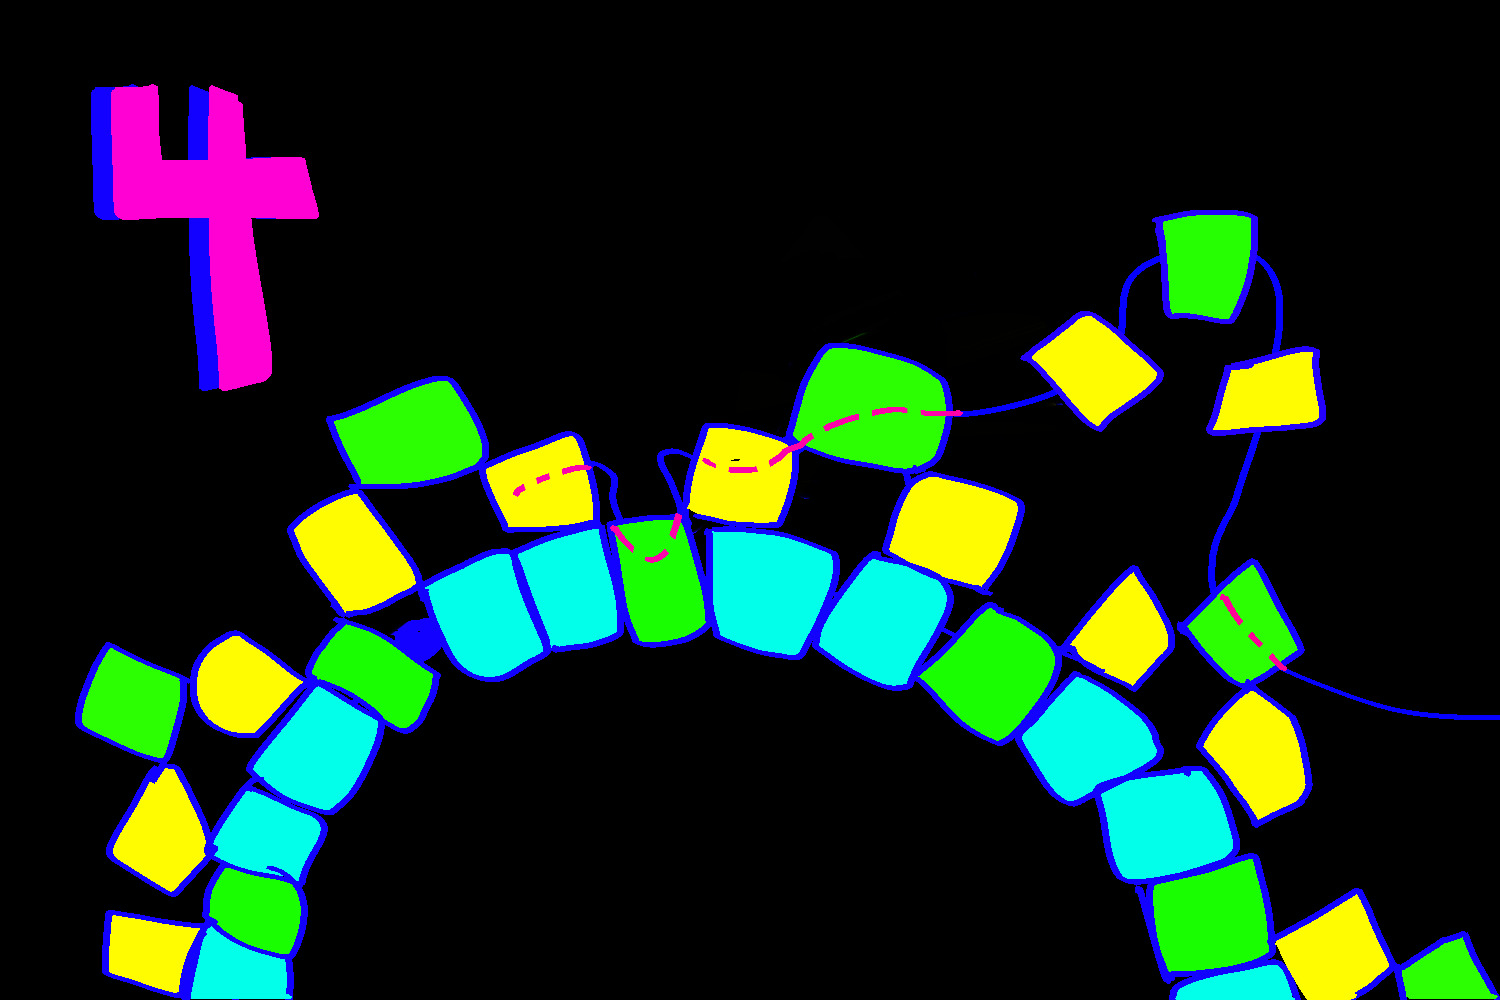
For step 4, string your cord back through beads as shown - the dotted lines represent going through a bead. Then, start stringing beads on in the same pattern, but this time using the in between beads at the top of your loops to secure them.
For step 5, once you've gone all the way around the bracelet with step 4, string your cord back through a few beads as shown and then start adding line beads in between all your in between beads on the top row. Once again, go all the way around your bracelet.
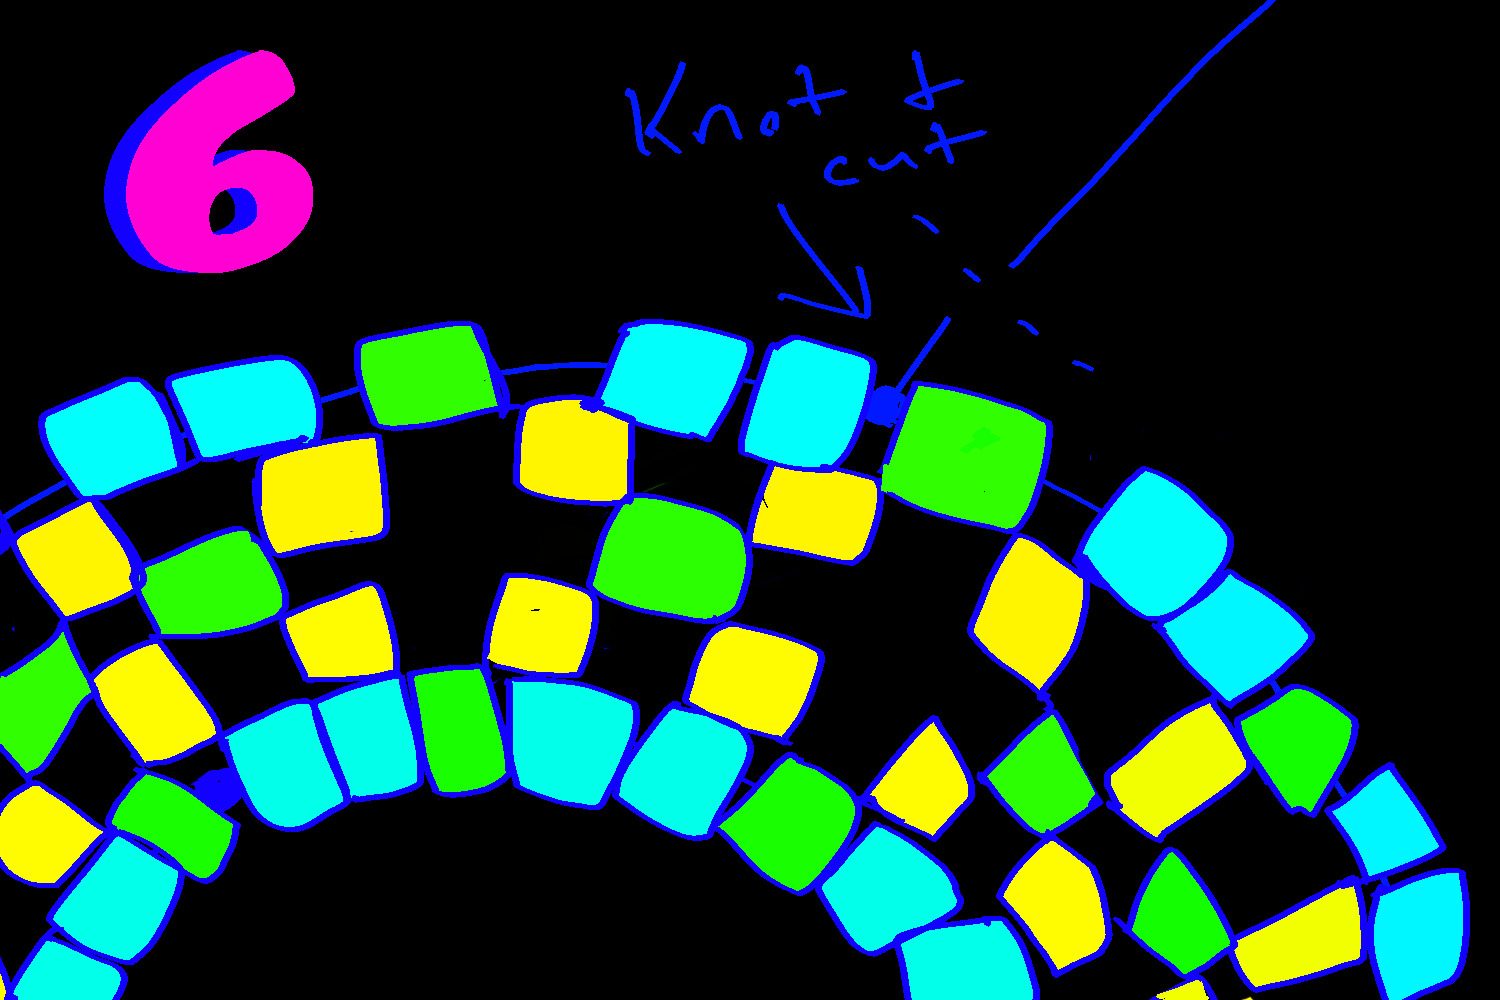
For step 6, make sure you've pulled everything tight, then tie a knot to secure your beads and cut off the extra string. At this point, you functionally have a complete bracelet and can stop. However, if you want to decorate it further, you can use the rest of the tutorial.

For step 7, get your second piece of string and tie it loosely around one of your line beads, then string it through to an accent bead as shown. The knot needs to be loose enough for you to untie later. Then, string on your 5 beads for one line of the 3D x, as shown. Continue this pattern around your kandi in a sort of zig-zag.
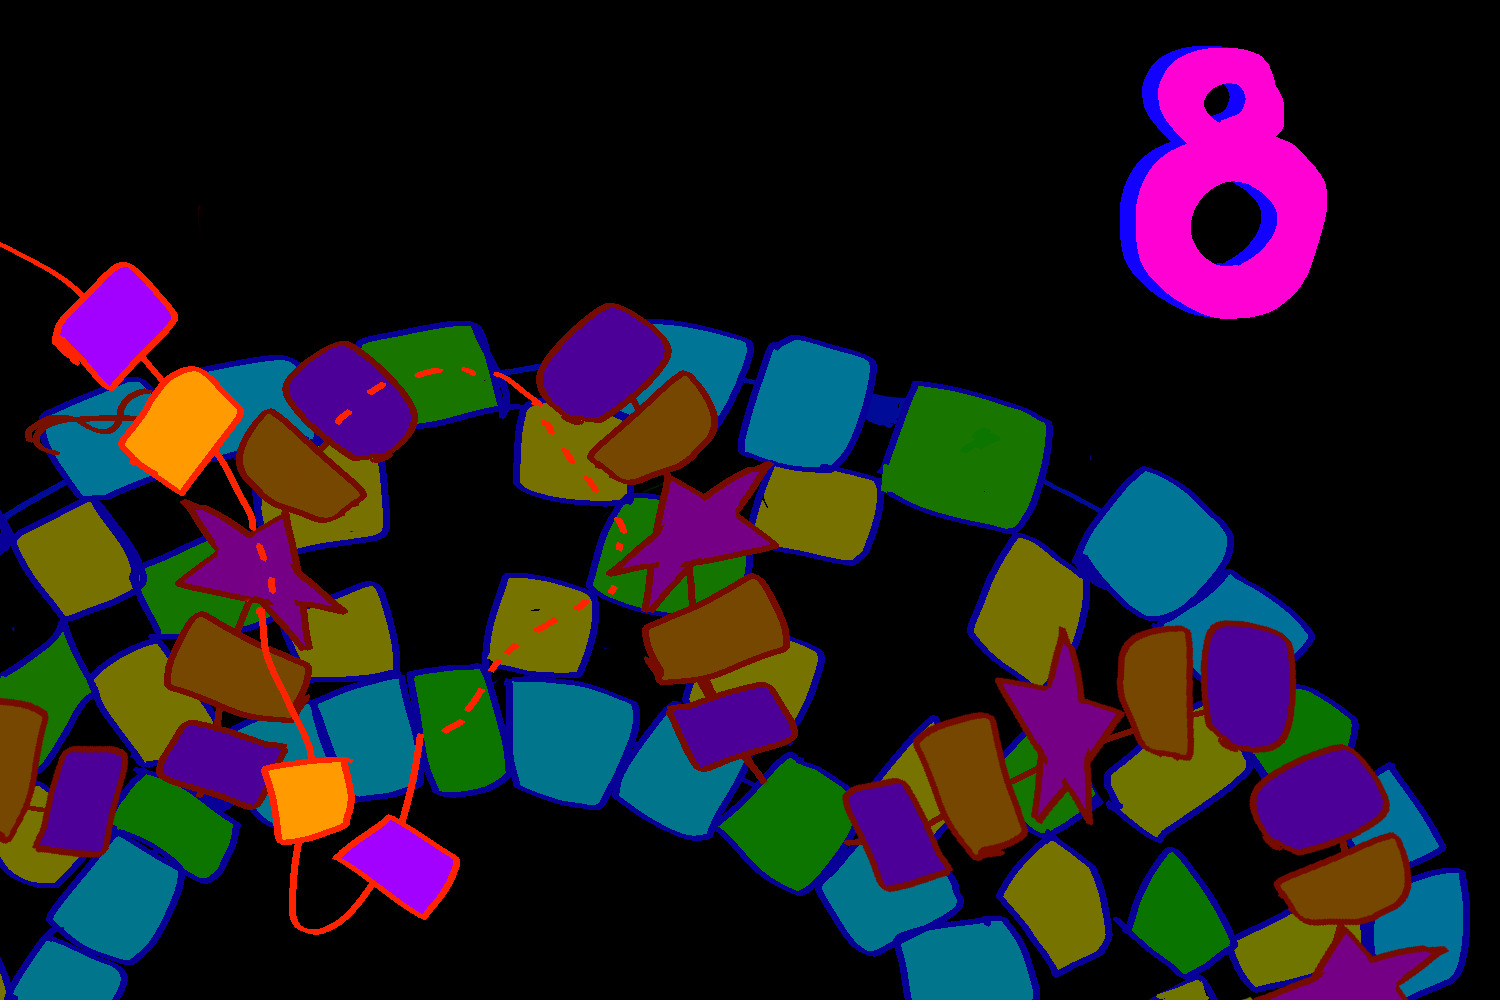
For step 8, string your cord back through several of the beads on the main cuff as shown until it comes out of an in between bead that hasn't yet had part of a 3D x attached to it. Then, put on 2 of your 3D x beads and string the cord through the accent bead. After that, put on the other 2 3D x beads and string it back through the next unused in between bead. Continue around your kandi to complete the pattern.
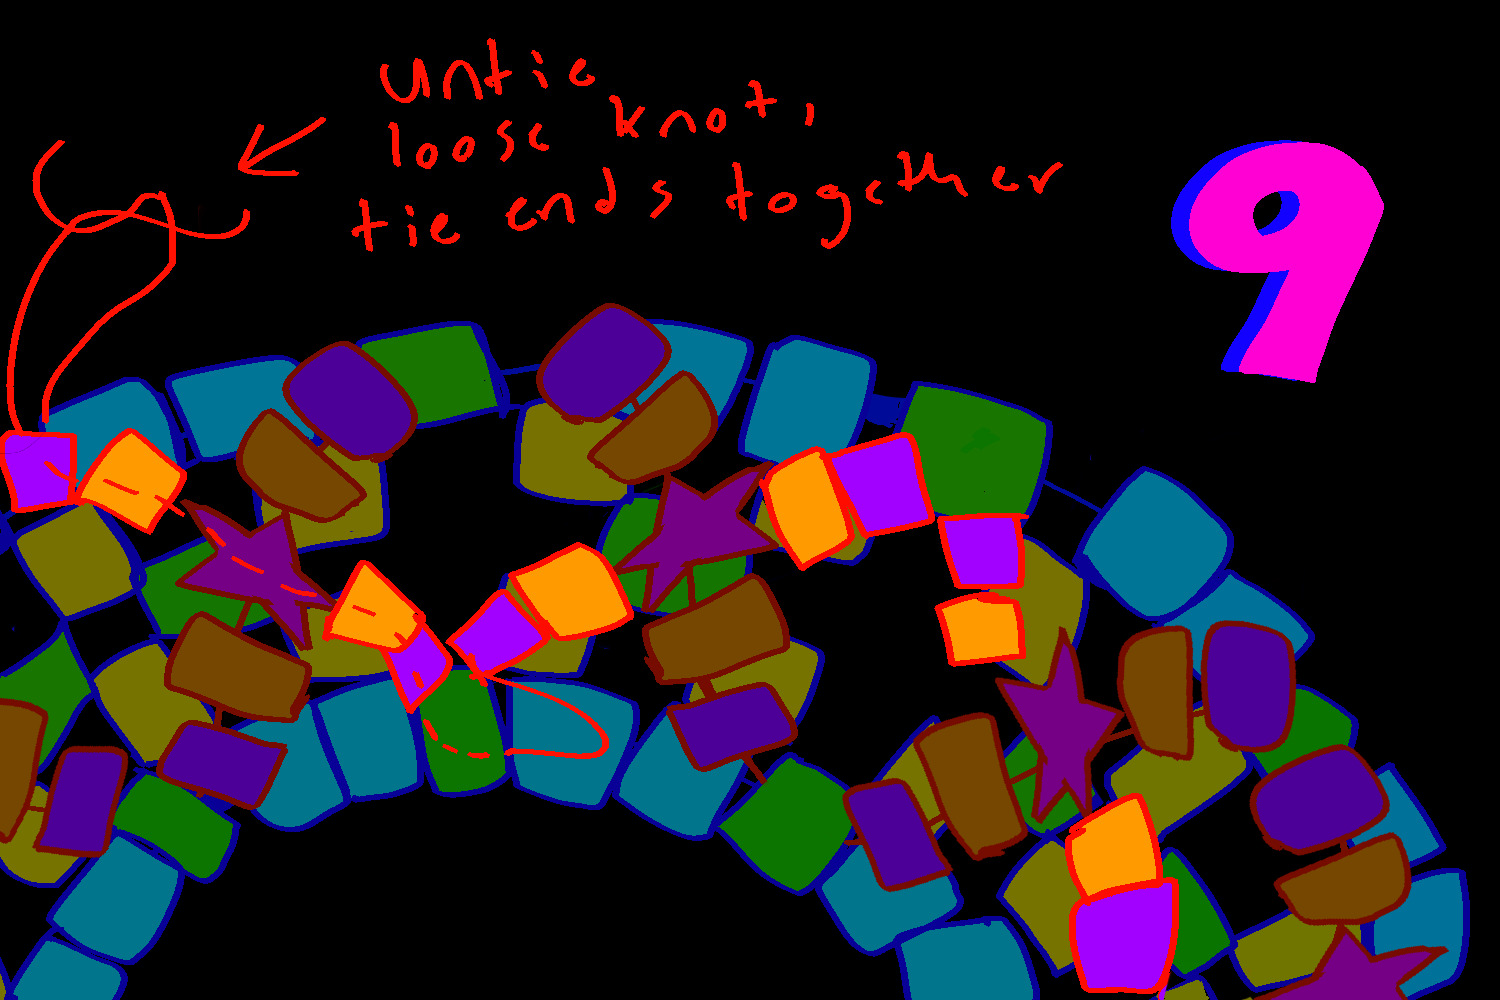
The final step after you've completed all of your 3D x's is to string your cord back through beads until it comes out near the loose knot you tied earlier. Then, untie the loose knot and tie both ends of the cord together, and trim off any excess. Your kandi is then finished!